Welcome to Puffin Secure Browser. We'll walk you through the basic features of Puffin. When you are ready to try out more advanced features, feel free to click other links to learn more about how Puffin can help you with your daily work.
Your most visited websites are displayed in the New Tab page.
Whether you know the exact URL or not, the URL bar conveniently takes you to the destination you are looking for online. Enter the website address directly or enter search keywords, and Puffin will present you with relevant information from your bookmarks, or take you to the results from the search engine of your choice.
If you are concerned about leaving browsing data on the device you are using, browsing in Incognito mode can ease your worries. Enable Incognito mode to access confidential data on the web. Once the browsing session ends, close Puffin and all traces of browsing history are deleted automatically.
Browsing data can also be manually cleared in just a few steps. Puffin allows you to flexibly choose the types of data to delete, ranging from browsing history, cached images and files, cookies, autofill form data, passwords, and so on.
This site provides answers to the questions you might have while using Puffin. If you encounter any issue that requires assistance from our customer support team, go here and provide details on the issue you are experiencing. We are always happy to help.
Speed Dials in Puffin allow you to have quick access to your favorite websites in the Start Page or when opening a new tab. Puffin automatically detects the websites you visit most often and display them in Speed Dials.
At first-time launch, Puffin automatically presents some of the most popular websites to you. If you want to remove any of the default websites, click on the x button on the upper right corner of the website thumbnail.
To make a website appear in Speed Dials, just visit it more than five times, and it will be automatically added to Speed Dials.
Puffin supports tabbed browsing. Access multiple websites in a Puffin instance by opening them in different tabs.
At the top of the Puffin app window, click on the + button on the right to the last tab, or press Ctrl + T to open a new tab.
When you open a new tab, three elements are displayed: the navigation bar, search bar, and Speed Dials.
By default, Speed Dials are displayed, allowing easy access to frequently visited websites.
You can switch to History and Bookmarks views easily on the navigation bar, which give you a view of your browsing data and allow you to quickly get back to websites that matter to you.
Search terms and URL addresses can be directly typed in the search bar for quick retrieval of relevant information.
You can easily change the postion of tabs by clicking a tab and dragging it to the left or right.
You can close a tab by clicking the "x" button on the tab, press the mouse middle key on the tab, or press the keyboard shortcut Ctrl + W.
After closing a tab, you can restore it by pressing Ctrl + Shift + T.
Browse the Internet safely without leaving cookies, cache, and history data on your device.
To enable Incognito browsing, click the main menu > New Incognito Window. All website data from the Incognito window will be cleared once you close Puffin.
To print a webpage from Puffin, go to the main menu > Print or press Ctrl + P.
Puffin displays a print preview page for you to review the layout. Hover the cursor to the top to download the PDF output or print physical copies from the printer.
Puffin Secure Browser allows you to download files to local storage as well as directly to cloud storage services. The cloud storage services we support include Google Drive, Dropbox, and OneDrive.
Note: All files are automatically scanned for viruses before they reach their download destinations for Enterprise plan subscribers.
Click the link to the file you wish to download.
In the pop-up dialog, select Local storage.
The file will be saved to your desired location in local storage.
Note: You can set Local storage as the default download destination by selecting Use the same destination for future downloads in the pop-up dialog.
Click the link to the file you wish to download.
In the pop-up dialog, select Google Drive.
Enter your Google username and password to give Puffin the permission to create a folder and files in your Google Drive.
The file will be saved to your Google Drive.
You will not need to authorize Puffin again the next time you download a file to Google Drive.
Note: You can set Google Drive as the default download destination by selecting Use the same destination for future downloads in the pop-up dialog.
Click the link to the file you wish to download.
In the pop-up dialog, select Dropbox.
Enter your Dropbox username and password to give Puffin the permission to create a folder and files in your Dropbox.
The file will be saved to your Dropbox.
You will not need to authorize Puffin again the next time you download a file to Dropbox.
Note: You can set Dropbox as the default download destination by selecting Use the same destination for future downloads in the pop-up dialog.
Click the link to the file you wish to download.
In the pop-up dialog, select OneDrive.
Enter your Microsoft username and password to give Puffin the permission to create a folder and files in your OneDrive.
The file will be saved to your OneDrive.
You will not need to authorize Puffin again the next time you download a file to OneDrive.
Note: You can set OneDrive as the default download destination by selecting Use the same destination for future downloads in the pop-up dialog.
Follow the steps below to remove your cloud storage account information from Puffin Secure Browser.
- Go to main menu > Settings.
- Go to Clear browsing data.
- Select Cloud storage authorization.
- Click Clear.
Puffin is a remote browser. The websites you see on your desktop device are actually rendered from our cloud servers. If you are experiecing issues with connection or performance, go to the main menu > Reconnect to server. Your browsing session will be transferred to a different server.
Puffin Secure Browser provides the following keyboard shortcuts to speed up your browsing activities.
| Action | Shortcut |
|---|
| Open a new window | Ctrl + n |
| Open a new window in Incognito mode | Ctrl + Shift + n |
| Open a new tab, and jump to it | Ctrl + t |
| Close the current tab | Ctrl + w |
| Close the current window | Ctrl + Shift + w |
| Open the Bookmarks Manager | Ctrl + Shift + o |
| Open the History page in a new tab | Ctrl + h |
| Open the Downloads page in a new tab | Ctrl + j |
| Open options to print the current page | Ctrl + p |
| Make everything on the page bigger | Ctrl and + |
| Make everything on the page smaller | Ctrl and - |
| Return everything on the page to default size | Ctrl + 0 |
| Open a link in new background tab | Ctrl + Click a link |
| Open a link, and jump to it | Ctrl + Shift + Click a link |
| Open a link in a new window | Shift + Click a link |
Puffin Secure Browser provides a full-screen mode for you to browse websites in a distraction-free environment.
To enable the full-screen mode, press F11 on your keyboard. The URL bar and bookmark bar will be temporarily hidden
Press F11 again to exit the full-screen mode.
Puffin Secure Browser provides a built-in Ad blocker, which you can enable to browse websites without seeing ads.
Follow the steps below to enable the ad blocker.
- Go to the main menu > Settings.
- Go to Content settings.
- Turn on Ad Blocker (Beta).
Note: Ad blocker is still in beta. Feel free to contact us if you find any websites where Ad blocker can work better.
Puffin Enterprise Cloud Portal is a cloud security admin console which allows you to track license usage and configure Internet security policies for Puffin users in your organization.
Track license usage
Dashboard provides a quick overall picture of the available and taken seats in your enterprise license. Click the numbers on the top section for active device information.
Enforce website access policies
Web filtering allows you to create blacklists and whitelists of Internet destinations to fend off potential threats. Scroll to Add a new filtering rule and add rules as needed.
Perform system-wide configurations and site-specific security policies
System-wide file download, file upload, and certification verification (Enterprise-only) policies can be configured in Configurations. In addition to global settings, site-specific security settings can be configured in Security policy.
Manage Puffin users
User whitelist lets you set the access permission for Puffin Secure Browser based on individual user email addresses. By default, all users under your enterprise domain can register to use Puffin Secure Browser. You can change the setting by deleting the default rule @domain.com. Then, add or import user email addresses to the whitelist.
Control IP-based access (Enterprise feature)
IP access lists restrict Internet browsing in Puffin Secure Browser to specific IP addresses or IP address ranges. Scroll to Add a new whitelisted IP address and add IP addresses as needed.
Dashboard presents a quick overall picture of the available and taken seats in your enterprise license. The following sections display different information about your license usage.
Monthly active devices
This section displays the number of active devices versus the maximum number of devices allowed in your Enterprise subscription. Click on the number to see detailed information on device IDs, their last active users, and last login time.
Other information
Dashboard also displays other information for your reference.
- User ID: Your enterprise ID, also the username for logging into Puffin Enterprise Cloud Portal.
- License type: The license type of the subscription you purchased from us.
- Registration date: The date your account is created.
- Contact mail: The IT administrator responsible for configuring settings on Enterprise Cloud Portal.
- User whitelist: Whether you have configured the User whitelist or not.
- Web filtering: Whether you have configured web filtering rules or not.
- IP access lists (Enterprise feature): Whether you have configured IP access lists or not.
As an IT administrator, you can blacklist and whitelist URLs to prevent users from visiting certain websites. By taking control of users' Internet browsing, your organization is protected from viruses and malicious content found on some websites.
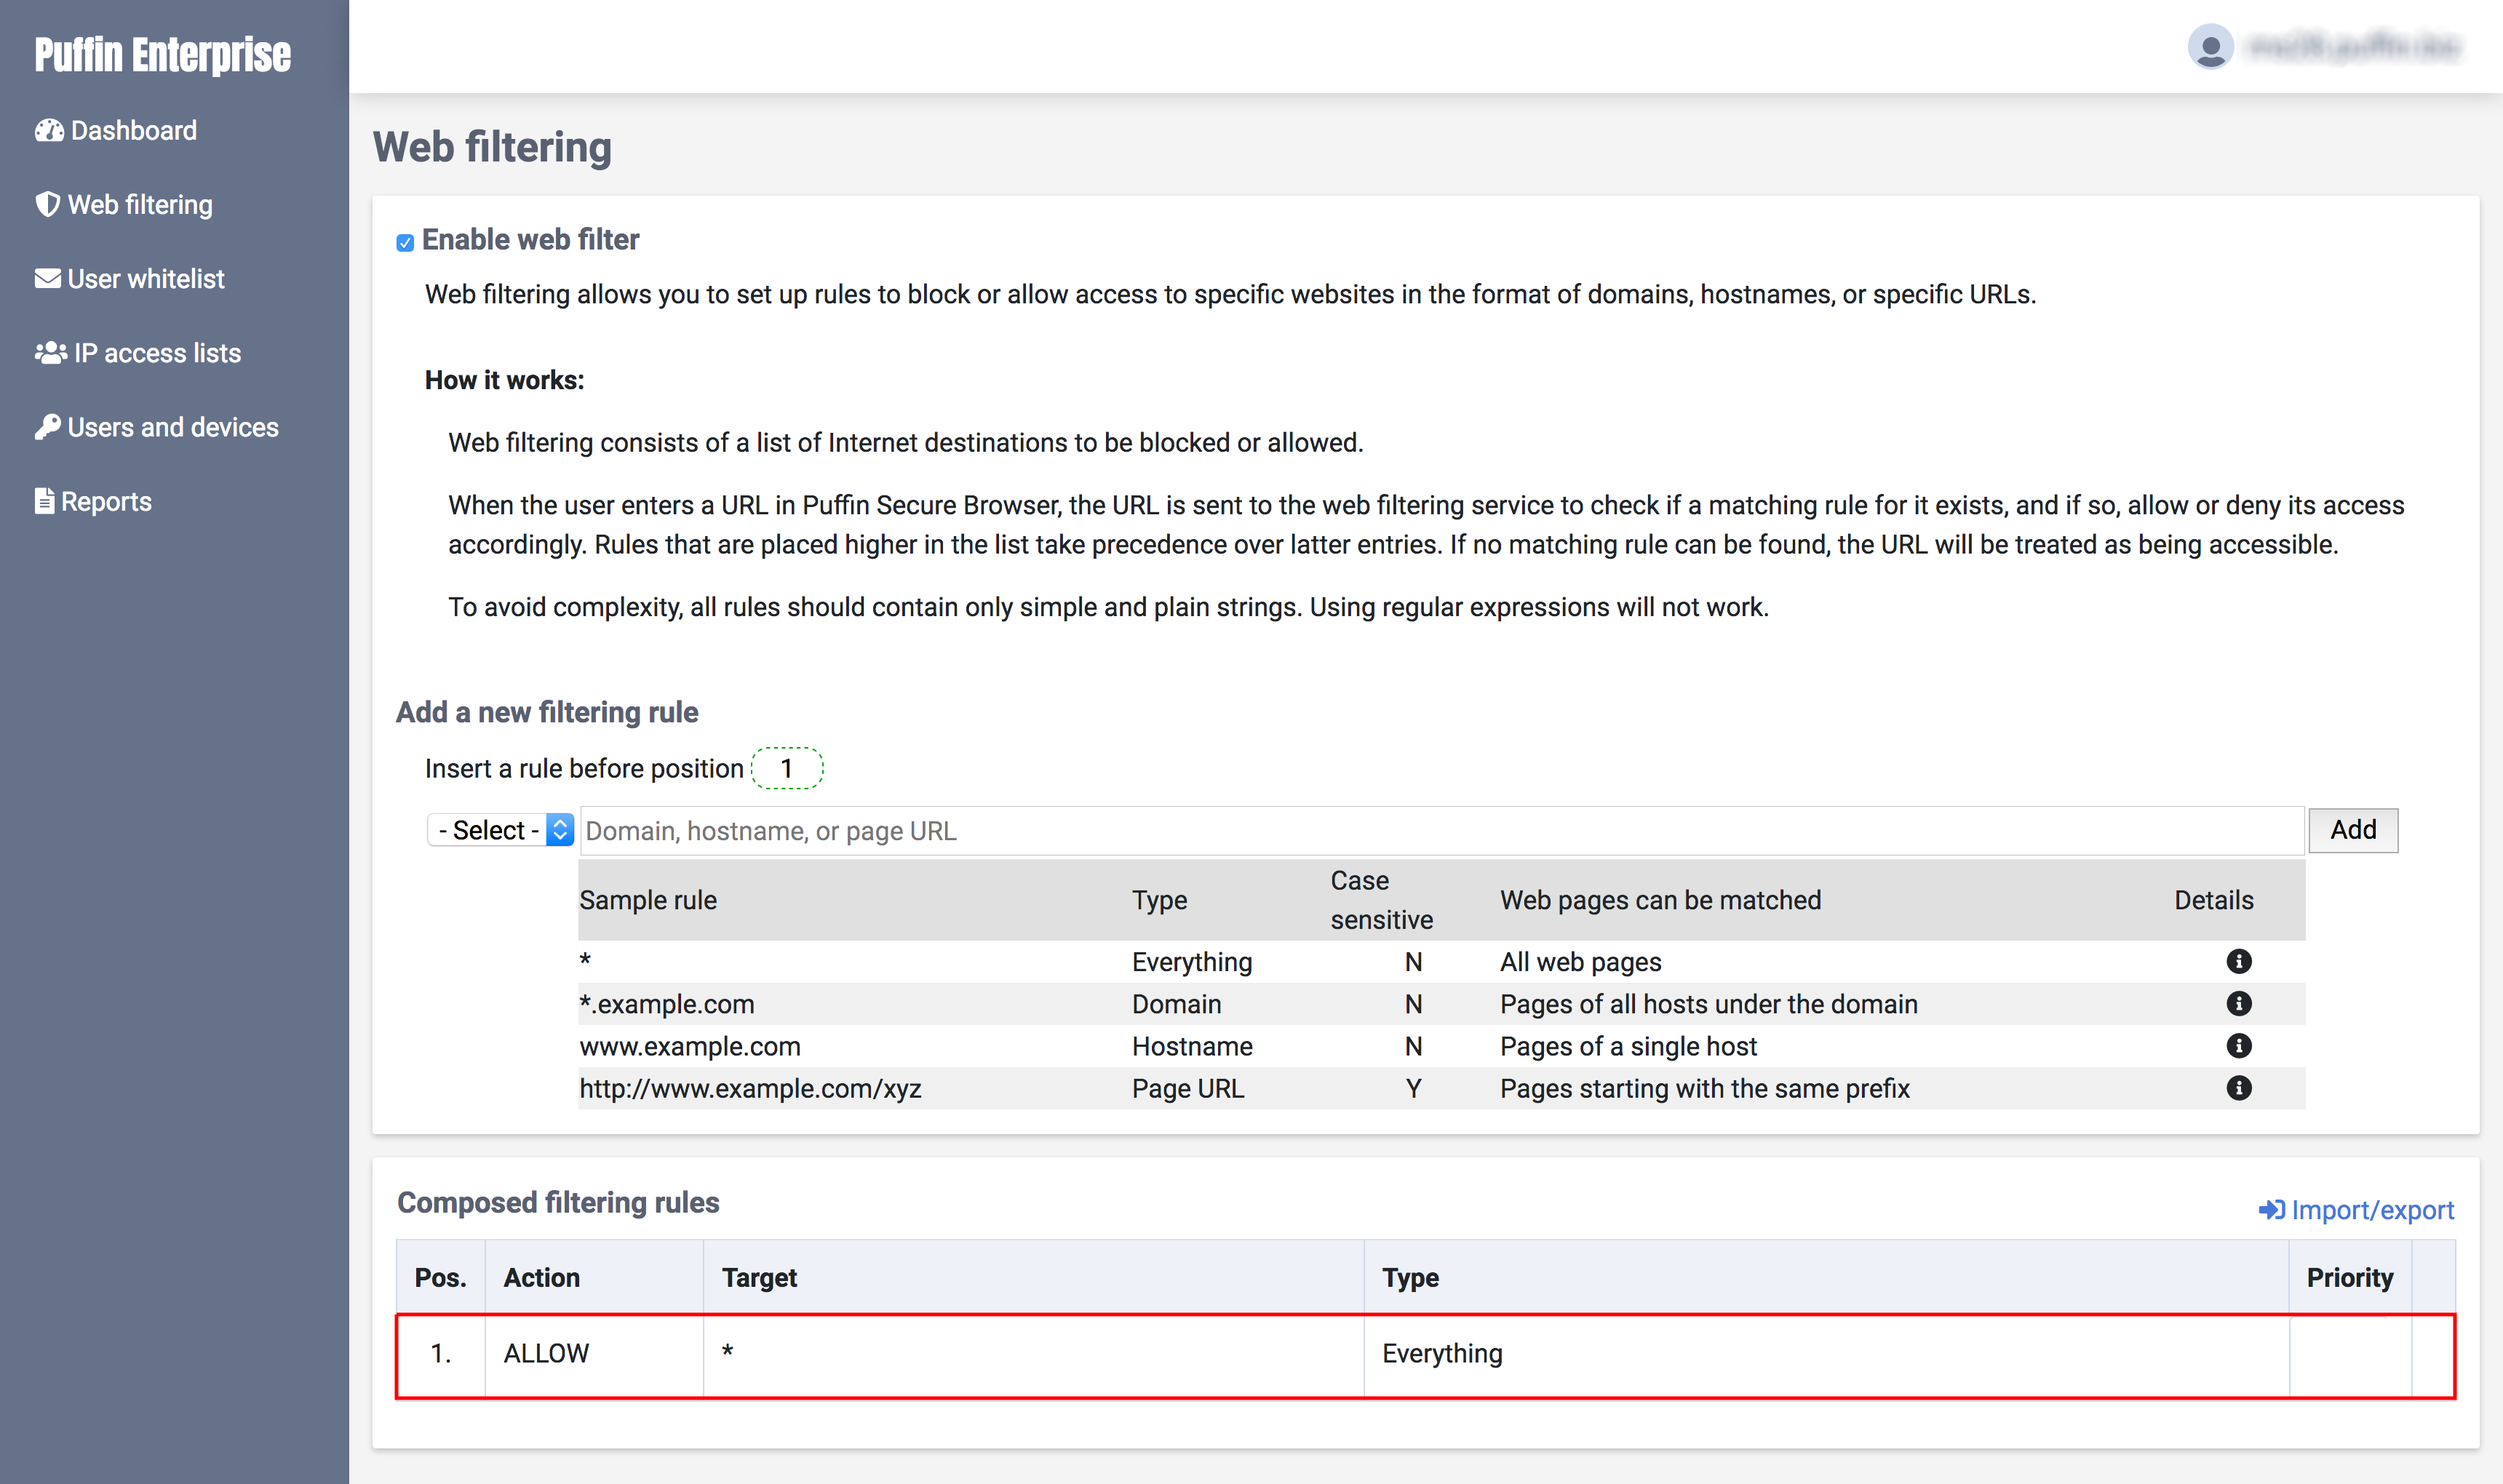
To enable web filtering for your organization, tick the checkbox Enable web filter.
How do I configure Web filtering?
Web filtering can be done by two approaches: (1) allowing all websites and selectively blocking some (default, suitable for work environments), and (2) blocking all and selectively allowing some (suitable for educational institutions).
Approach 1: Allow access to all websites and add rules to block certain websites
By default, Puffin users are allowed to access all websites. When visiting Web filtering for the first time, the default rule ALLOW * is placed at the bottom.
How to add a new rule:
- Scroll to Add a new filtering rule.
- (Optional) Set the position you want to insert the rule. The default is 1, at the top.
- Toggle the dropdown list to select ALLOW or BLOCK. When no option is selected, BLOCK takes precedence.
- Enter the domain, hostname, or URL you want to include in the rule.
- Click Add.
- The rule is added. It will take effect after users relaunch their Puffin Secure Browser.
Note: For blocking rules to work properly, the rule ALLOW * must stay at the bottom of the list, indicating that it is the last rule for the web filtering service to check.
Tip:The page includes instructions on the URL formats that Puffin Enterprise Cloud Portal supports. You can also refer to the Work with URL formats section for further details.
Approach 2: Block access to all websites and add rules to allow certain websites
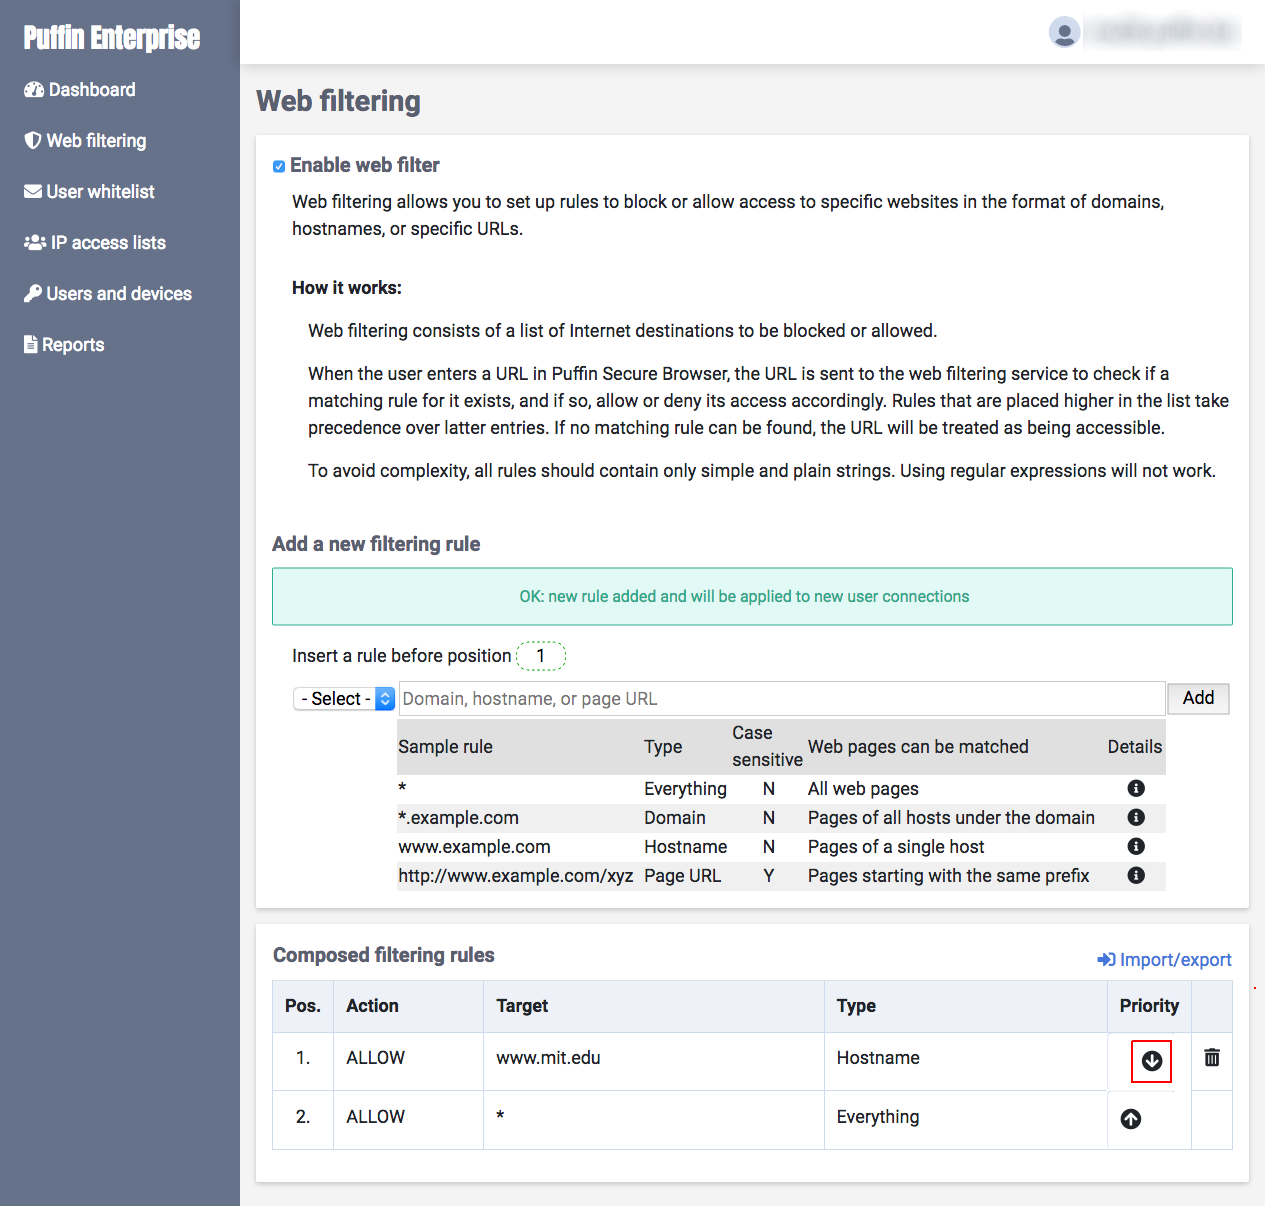
In educational institutions, educators may want to only whitelist certain educational websites and block juvenile students' access to inappropriate websites. In this case, the default rule ALLOW * should be removed before the rule BLOCK *, which blocks access to all websites, can be added.
How to remove the ALLOW * rule:
- Scroll to Add a new filtering rule.
- Then, add a rule which whitelists a website first.
- Toggle the dropdown list and select ALLOW.
- Enter the domain, hostname, or URL you want to include in the rule.
- Click Add.
- Click the down arrow to change the order of the rule you just added.
- The rule is now below the rule
ALLOW *. - The Trash icon now appears next to the rule
ALLOW *. - Click the Trash icon to delete the rule.
- Add a rule which blocks all websites.
- Toggle the dropdown list and select BLOCK. Enter the wildcard character
* in the input field. - Click Add.
- Move the rule
BLOCK * to the bottom of the list. - You can now start adding more URLs you want to whitelist by selecting ALLOW and entering domains, hostnames, or URLs.
Note: For blocking rules to work properly, the rule BLOCK * must stay at the bottom of the list, indicating that it is the last rule for the web filtering service to check.
Tip: The page includes instructions on the URL formats that Puffin Enterprise Cloud Portal supports. You can also refer to the Work with URL formats section for further details.
Puffin Enterprise Cloud Portal supports four types of URL formats, namely, the wildcard notation * that includes all websites, domain names, hostnames, and page URLs.
Allow or block all websites
The rule ALLOW * is enabled by default. The asterisk * encompasses all websites.
Similarly, using an asterisk in a blocking rule BLOCK * blocks all websites. Refer to Approach 2: Block access to all websites and add rules to allow certain websites for how a universal blocking rule can be added.
Note: Be careful when using an asterisk as it would affect all browsing activities throughout your organization.
Allow or block a whole domain
To include all web pages under a domain in a rule, place the wildcard notation * at the beginning of a domain and followed by a dot (.), e.g. *.example.com. *.example.com covers login.example.com, www.example.com/example, and so on.
It is not possible to use an asterisk to wildcard a different part of the domain. The following examples will not work:
example*.com*example.comexample.*
Allow or block a hostname
To include all web pages under a hostname, enter the hostname to the rule, e.g. www.example.com. www.example.com covers all pages under www.example.com, but not login.example.com or example.com.
Allow or block specific page URLs
Web filtering also supports allowing or blocking full URLs. You can allow or block certain parts of a website based specifically on the full URL. The full URL in a rule will be treated as a prefix, and all subordinate pages underneath would be covered by the rule.
URL normalization for web filtering
Puffin Web filtering conforms to several URL normalization standards. There are certain guidelines to be followed to ensure that the URLs you enter would actually be allowed or blocked. The URL normalization criteria are listed as follows.
| URL type | Guideline |
| Protocol Schema (both HTTP and HTTPS protocols are included; other protocols are not supported) | http://www.example.com or https://www.example.com |
| Username:Password (should be stripped) | user:pass@example.com → example.com |
| Ports (should be stripped) | example.com:8080/abc → example.com/abc |
| Trailing slashes (disregarded if entered) | example.com/abc/ → example.com/abc |
| Character case (normalized to all lower case) | EXAMPLE.cOm/abC → example.com/abc |
| Page anchors (the hash sign #, automatically stripped) | example.com/#info → example.com |
Web filtering only supports plainly defined rules. Using regular expressions is not supported.
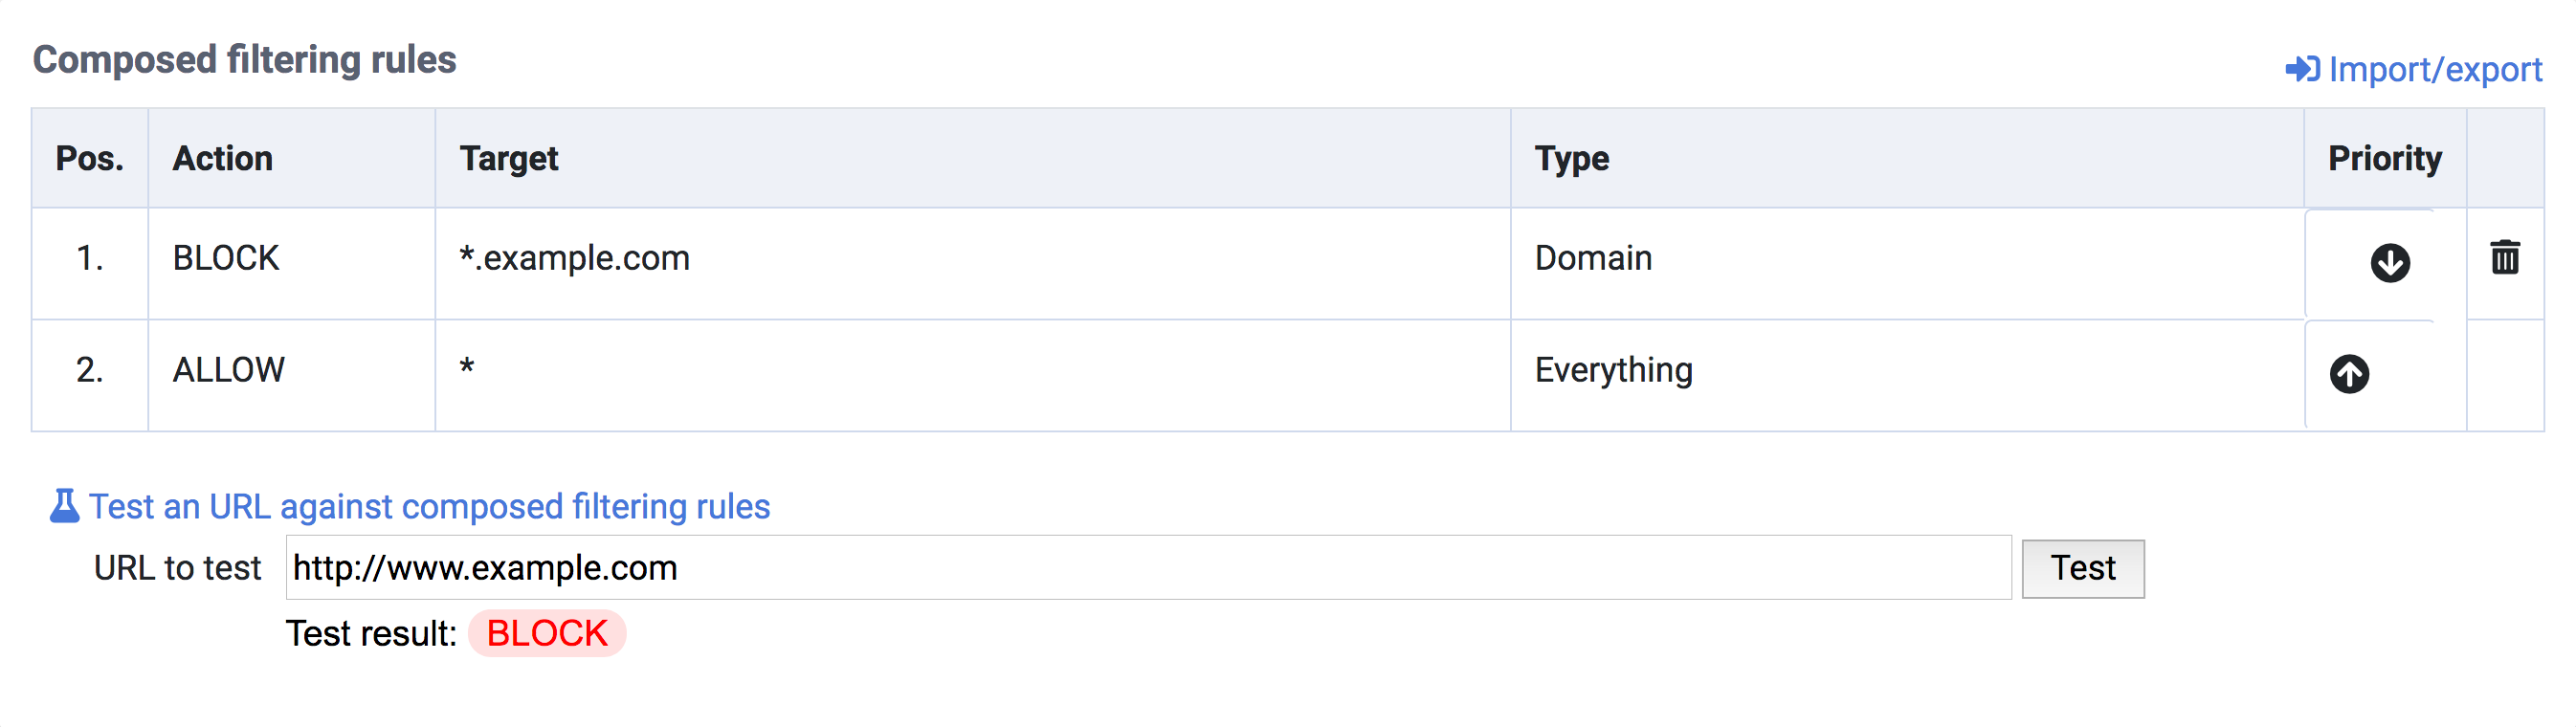
Puffin Enterprise Cloud Portal provides a tool for you to quickly verify if the websites you want to allow or block are covered by the rules you have defined.
- Scroll to Test an URL against composed filtering rules.
- In the field next to URL to test, enter the URL you want to check.
- Click Test.
- If the URL can be accessed, the result would be ALLOW. If the URL is blocked, the result would be BLOCK.
If you encounter any URLs which web filtering cannot allow or block, feel free to contact our customer service.
In addition to adding web filtering rules one by one, Puffin Enterprise Cloud Portal provides bulk import and export features.
Note: The file uploader supports text files in the format of one rule per line. A rule consists of an action (ALLOW or BLOCK), a space, and the included websites. For example:
ALLOW *BLOCK www.example.comBLOCK *.example.com
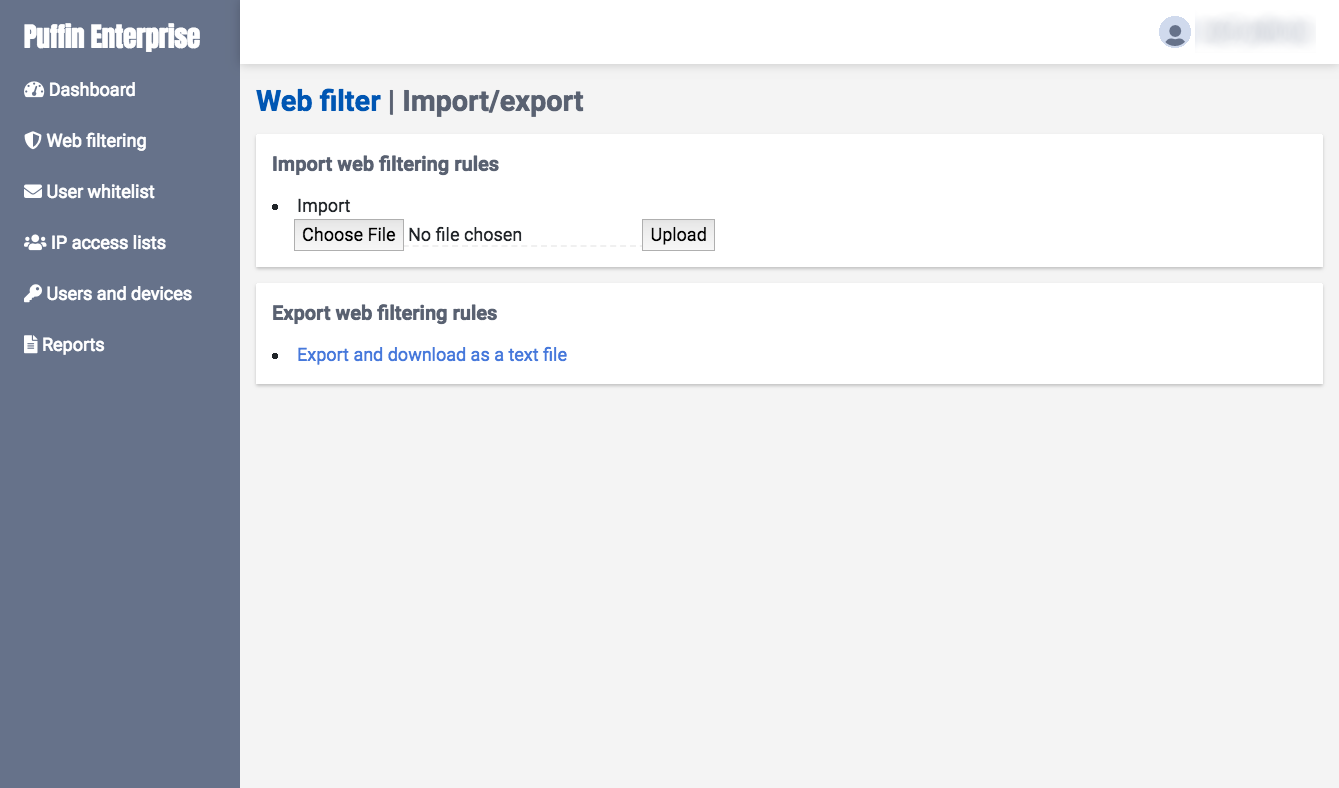
How to import a text file:
- Scroll to Composed filtering rules.
- Click Import/export.
- Under the Import section, click Choose File and choose the target text file (.txt) to upload.
- Click Upload.
- Click OK when the confirmation dialog appears.
- The rules are imported and will overwrite your existing data.
Once you've configured the web filtering rules, you can download a text file (.txt) of the rules to your hard drive. You can show this file to others to let them know the currently active web filtering rules without giving them access to Enterprise Cloud Portal.
Also, you may download the file, perform some editing, and import the file to Enterprise Cloud Portal again to implement new rules.
How to export your web filtering rules:
- Scroll to Composed filtering rules.
- Click Import/export.
- Scroll to Export web filtering rules.
- Click Export and download as a text file and save the file to your local hard drive.
Configure security policy settings for specific domains or hostnames when users visit them in Puffin Secure Browser.
The available rules you can set up depend on the global settings in Configurations. Only when a component is turned on in Configurations can you configure its corresponding security policies. When the following components are turned on in Configurations, they will appear as available options in security policies.
- Certificate verification (Enterprise feature)
- Clipboard (Enterprise feature)
- File download
- File upload
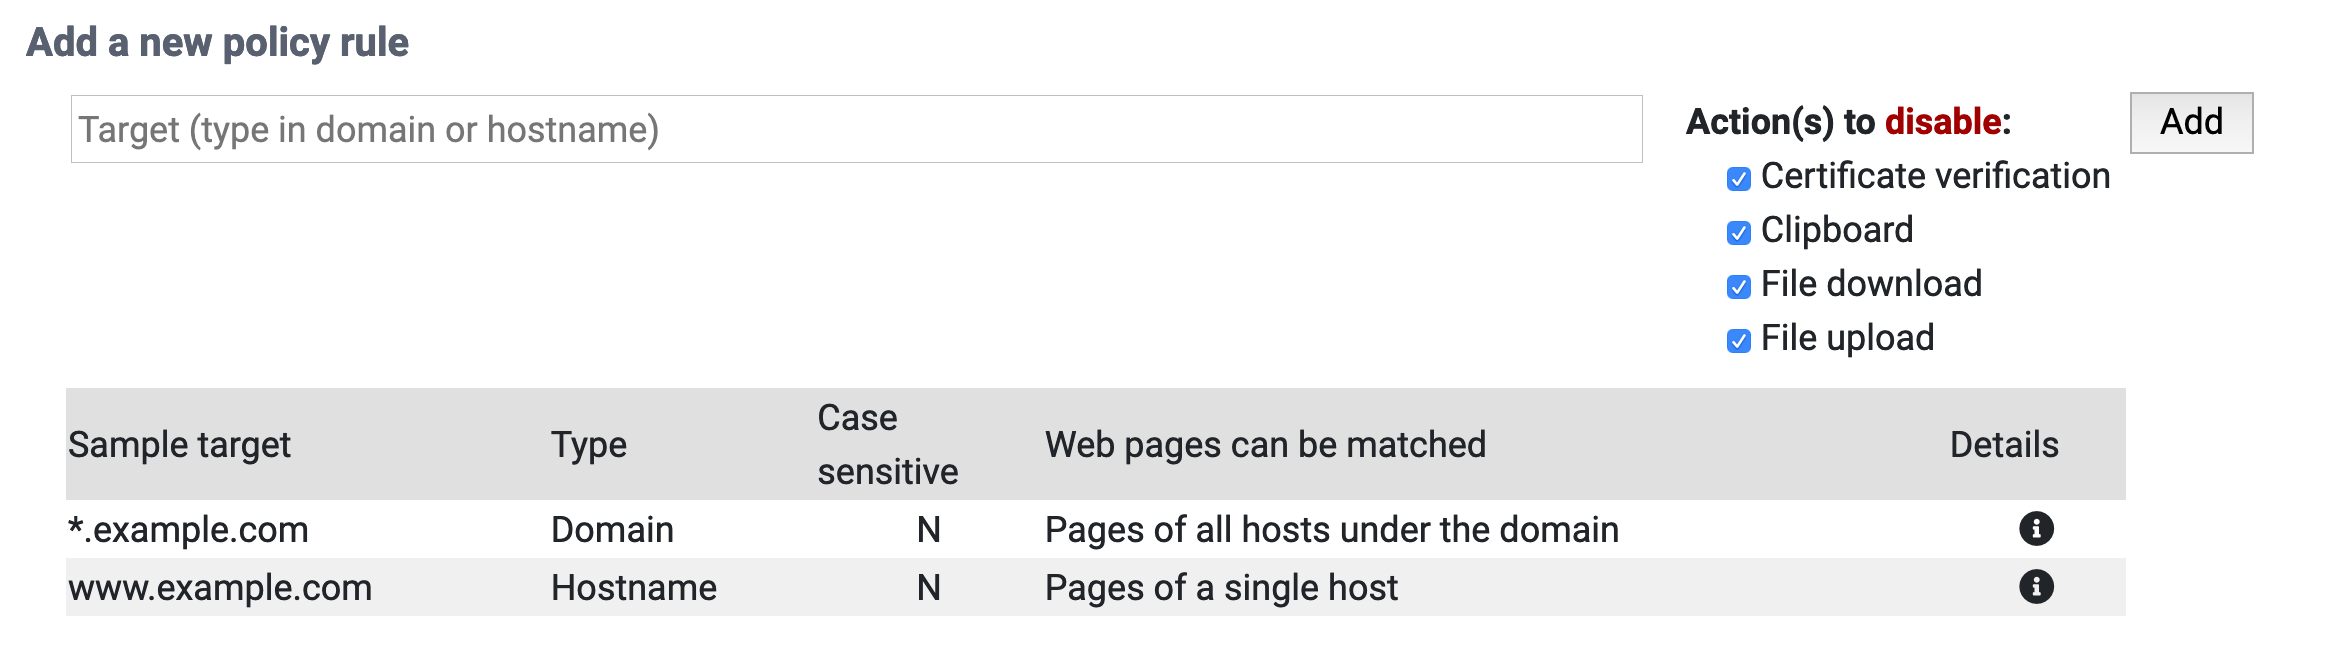
- Scroll to Add a new policy rule.
- Enter a domain or hostname where you want to specify a security policy.
- Check the options to include in this policy.
- Click Add.
- After adding a rule, you can still modify the affected features in the Policy rules section below.
In addition to adding security policy rules one by one, Puffin Enterprise Cloud Portal provides bulk import and export features.
Note: The file uploader supports text files in the format of one rule per line. Simply enter the domain name or hostname, followed by a space and the options you want to disable. For example:
*.example.com disable_cert_verification disable_clipboard disable_upload disable_download
How to import a text file:
- Scroll to Policy rules.
- Click Import/export.
- Under the Import security policy rules section, click Browse and choose the target text file (.txt) to upload.
- Click Upload.
- Click OK when the confirmation dialog appears.
- The user emails are imported and will overwrite your existing data.
Once you have configured all security policy rules, you can download a text file (.txt) of the list to your hard drive. You can perform some editing, and import the file to Enterprise Cloud Portal again to add new rules.
How to export your security policy rules:
- Scroll to Policy rules.
- Click Import/export.
- Scroll to Export security policy rules.
- Click Export and download as a text file and save the file to your local hard drive.
Set the access permission for Puffin Secure Browser based on user email addresses.
This section displays the number of enrolled users versus the maximum number of users allowed in your Enterprise subscription.
After subscribing to a Business subscription, all users whose mail domain matches the one in your registration can activate their Puffin Secure Browser clients. This default setting is indicated as follows.
You can limit Puffin Secure Browser activation and usage to specific users in your organization by adding user email addresses to the user whitelist.
- Scroll to Mail/domain allowed to register.
- Click the Trash icon next to the default domain.
- Add user email addresses to the list one by one.
Note:
- Only users from the domain associated with your account can be added to the whitelist. Adding users from other organizations is not supported at the moment.
- You can add as many users as you like to the whitelist. However, only the number of users that does not exceed your license quota can register to use Puffin.
In addition to adding user emails one by one, Puffin Enterprise Cloud Portal provides bulk import and export features.
Note: The file uploader supports text files in the format of one mail address per line. Simply enter mail addresses and save them as a text (.txt) file.
How to import a text file:
- Scroll to Mail/domain allowed to register.
- Click Import/export.
- Under the Import mail domain/box section, click Choose File and choose the target text file (.txt) to upload.
- Click Upload.
- Click OK when the confirmation dialog appears.
- The user emails are imported and will overwrite your existing data.
Once you've configured the user whitelist, you can download a text file (.txt) of the list to your hard drive. You can perform some editing, and import the file to Enterprise Cloud Portal again to add new users.
How to export your user whitelist:
- Scroll to Mail/domain allowed to register.
- Click Import/export.
- Scroll to Export mail domain/box.
- Click Export and download as a text file and save the file to your local hard drive.
IP access lists log the IPs of local users, remote users, and remote hosts in an authentication database that is configured to control access to Puffin Secure Browser. Unwanted traffic or users are blocked, making your networking environment isolated and safe from attackers.
To enable IP access lists for your organization, tick the checkbox Only allow users from whitelisted IPs.
- Scroll to Add a new whitelisted IP address.
- Enter an IP address or IP block (IP range) you wish to add.
- Click Add.
- The IP address is added. It will take effect after users relaunch their Puffin Secure Browser.
Note: IP access lists support the CIDR (Classless Inter-Domain Routing) notation, in which the IP address is suffixed with a slash and a number, used to specify the length of the associated routing prefix, e.g. 5.6.7.0/24.
In addition to adding IP addresses one by one, Puffin Enterprise Cloud Portal provides bulk import and export features.
Note: The file uploader supports text files in the format of one IP address per line. Simply enter mail addresses and save them as a text (.txt) file.
How to import a text file:
- Scroll to Allowed IP addresses.
- Click Import/export.
- Under the Import user IP section, click Choose File and choose the target text file (.txt) to upload.
- Click Upload.
- Click OK when the confirmation dialog appears.
- The IP addresses are imported and will overwrite your existing data.
Once you've configured the IP access lists, you can download a text file (.txt) of the lists to your hard drive. You can perform some editing, and import the file to Enterprise Cloud Portal again to add new IP addresses.
How to export your IP access lists:
- Scroll to Allowed IP addresses.
- Click Import/export.
- Scroll to Export user IP.
- Click Export and download as a text file and save the file to your local hard drive.
Registered users allow you to find out who in your organization has activated Puffin, and how many devices have been associated with their email addresses. All users who have successfully activated Puffin will be listed in this page.
- Click Monthly active users on the upper right corner.
- Select the month you would like from the dropdown menu.
- You can click on the user emails one by one to see the detailed login history.
In addition to monitoring your license usage from the Dashboard, information on active devices in your organization can be retrieved from Active devices.
Active devices display the devices, their last active users in your organization, and the last active dates.
Follow the steps below to quickly look up monthly active devices.
- Select the month you would like from the dropdown menu at the top.
- You can click on the device IDs one by one to see the detailed login history.
After installation, IT administrators should review all configurations in this section to enforce the appropriate security measures for the organization. Configurations affect all Puffin Secure Browser instances and all websites users visit. The following components can be turned on and off.
- Certificate verification
- Clipboard
- File upload
- File download
- Document preview
- This component is only available to subscribers of the Enterprise Subscription.
Websites using the HTTPS connection need a security certificate, which secures and encrypts data going back and forth between the server and the web browser. Visiting websites whose security certificate is broken, expired, or missing may pose security risks to your corporate network.
By default, the option Enforce certificate verification is ON.
To allow users to access websites with bad certificates, uncheck Enforce certificate verification.
Alternatively, you can keep Enforce certificate verification on and whitelist certain websites that have not passed certificate verification in Security policy. For details, refer to the section on Security policy.
- This component is only available to subscribers of the Enterprise Subscription.
It is common practice to use copying and pasting functions in a browser. For convenience of usage, the option Enable clipboard is ON by default.
However, you may want to restrict clipboard access in Puffin Secure Browser for the following reasons.
- To prevent users from leaking sensitive data in your organization.
- To prevent users from copying malicious content to local devices.
To give you more control on how much you would like to allow clipboard access in Puffin Secure Browser, we provide three options.
- CUT/COPY and PASTE: This option allows users to use all clipboard functions.
- CUT/COPY only: Users can only copy content from Puffin Secure Browser, but they cannot paste content from their device clipboard to the web.
- PASTE only: Users can paste content from the device clipboard to the web, but they cannot copy content from the web to their device clipboard.
Alternatively, you can keep Enable clipboard on, use the default option CUT/COPY and PASTE, while restricting specific website's clipboard access. For details, refer to the section on Security policy in this document.
By default, the option Enable file upload is ON.
You can restrict Puffin Secure Browser users from uploading files to the web. This feature helps prevent users from uploading malicious attachments to their emails or any web forms.
To disable all file uploads in Puffin Secure Browser, simply uncheck Enable file upload.
Alternatively, you can keep Enable file upload on, while restricting specific website's file uploads. For details, refer to the section on Security policy in this document.
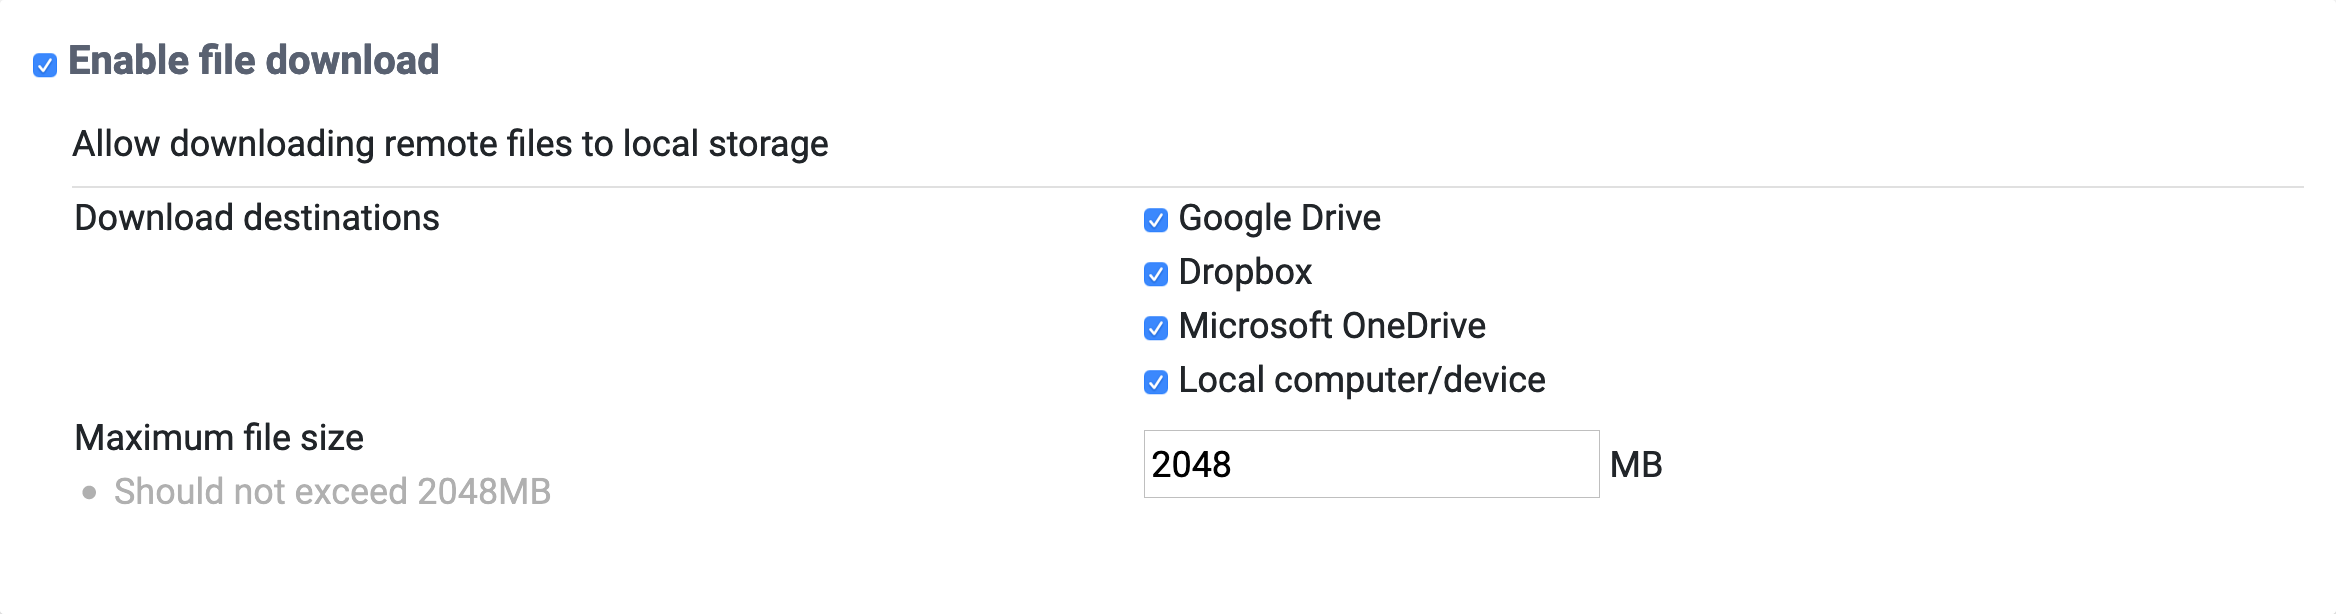
By default, the option Enable file download is ON.
Puffin Secure Browser supports downloading files directly to cloud storage services and local storage. For our Enterprise subscribers, virus scans are automatically performed before files are downloaded to the destination of your choice.
The download destinations you can allow in Puffin Secure Browsers are as follows.
- Google Drive
- Dropbox
- Microsoft OneDrive
- Local device/computer
How to prevent users from directly downloading files to any destination:
- Scroll to Enable file download.
- In the Download destinations section, uncheck any destinations you wish to disable.
- Click Save.
The allowed downloaded file size in Puffin Secure Browser is up to 2GB (2048MB). To change the allowed maximum file size, follow the steps below.
- Scroll to Enable file download.
- In the Maximum file size section, enter a new number in MB (Megabytes) as the allowed file size.
- Click Save.
To disable all file downloads in Puffin Secure Browser, simply uncheck Enable file download.
Alternatively, you can keep Enable file download on, while restricting specific website's file downloads. For details, refer to the section on Security policy in this document.
- This component is only available to subscribers of the Enterprise Subscription.
Puffin Secure Browser provides the ability to preview Microsoft Office documents without having to download them to your device. For convenience of usage, the option Enable document preview is ON by default.
The supported document types are as follows.
- Word documents (*.doc, *.docx)
- PowerPoint presentations (*.ppt, *.pptx)
- Excel files (*.xls, *.xlsx)
- PDF files (*.pdf)
Note: Users can always preview PDF files regardless of the Document Preview setting.
To disable the document preview feature in Puffin Secure Browser, simply uncheck Enable document preview.
Use Puffin Enterprise Cloud Portal's reports to gain a better understanding of how users are using Puffin Secure Browser.
When are reports generated?
The reports we currently offer are web access logs, which are generated 24 hours after new websites are visited.
What information is included in web access logs?
The information included in web access logs is listed as follows:
- The time when a website is accessed (format:
YY/MM/DD hh:mm:ss) - The IP address of the user.
- The user's platform.
- The user's email address.
- The pseudonym of the user's device.
- The website URL.
How do I download the logs?
- Scroll to Logs available for download (CSV format).
- If logs are available, links named after dates would be displayed.
- Click any dated links to download the log for the day.
Downloadable logs are offered in the CSV format. This lets you create more advanced reports and charts using other data analytics tools.